If it wasn’t normalized before, it’s definitely the norm now: it’s time to learn how to stream live workouts.
“Going live” on social media is a standard in the online fitness industry, and if you haven’t done so yet, now’s the time! Going live is an effective way to build up engagement on your social media profiles.
As an added bonus, using those live features will win you some brownie points with the big guy (yes, we mean Facebook) and can result in higher rankings in the Facebook and Instagram’s algorithms. We’ll walk you through how to prep for a livestream, how to actually “go live,” and how to earn new leads from your live workout.
How to Prepare to Stream Live Workouts
Choose the date
Set a date, time, and length for your live workout a few days in advance so that your clients and followers have a chance to book it into their calendar. Once you’ve chosen the date and time, stick to it—you don’t want to confuse followers. And be on time! AKA, a few minutes early.
As for channel, we’ll be talking about Facebook Live and Instagram Live, but there are other options, such as Zoom or Vimeo. Consider that Instagram Live allows guests but has a one-hour time limit, and Facebook Live doesn’t support guests anymore, but allows longer livestreams. The best thing about going live on social media is that your followers are already there. Never underestimate the value of that built-in audience. Accounts that go live on Instagram are automatically promoted to followers in the first few slots on the home page of the app, and on both Instagram and Facebook, at least some of your followers will receive a notification.
Test your tech
Now, it might go without saying, but you’ll want to test your livestream prior to the scheduled time. You definitely don’t want to have connectivity or process issues when a hundred people are prepped and ready to sweat. Test your connection on a private or personal account if you can, and if that’s not an option, feel free to do so on your regular account! Doing so is a chance to remind people about your upcoming live workout. Make sure you have a friend or business partner available to watch the test and give feedback.
Further, make sure your phone is fully charged (or plugged in while streaming!), and use the best possible camera, probably the newest device you have access to! Make sure you know how to use the apps to go live as well. Testing allows you to get comfortable with the process and handle any technical difficulties ahead of time. Follow our how-to below!
Set the scene
When it comes to livestreaming a workout, you want a clean and crisp setup. Good lighting, clear visibility, minimal distractions, and easy access to all the necessary props will be best for your attendees. You’ll also want to consider music—if this is something you want to include, make sure the speaker isn’t right beside your phone, or it’ll drown out your voice.
You’ll want to set your phone up on a stable surface for the livestream. Moving a phone around during a livestream is usually jarring for viewers, so set it up (balanced securely) or use a mount or stand to hold it in place. (Test this in advance too!) Make sure they have a good view of your positions—you don’t want to chop your head off when you stand up, for example—and you want them to be able to clearly see your positioning.
With online training, your clients can train with you anytime and anywhere.
Start your free 30-day trial of Trainerize.
How to Go Live, Step by Step
Facebook Live on Mobile
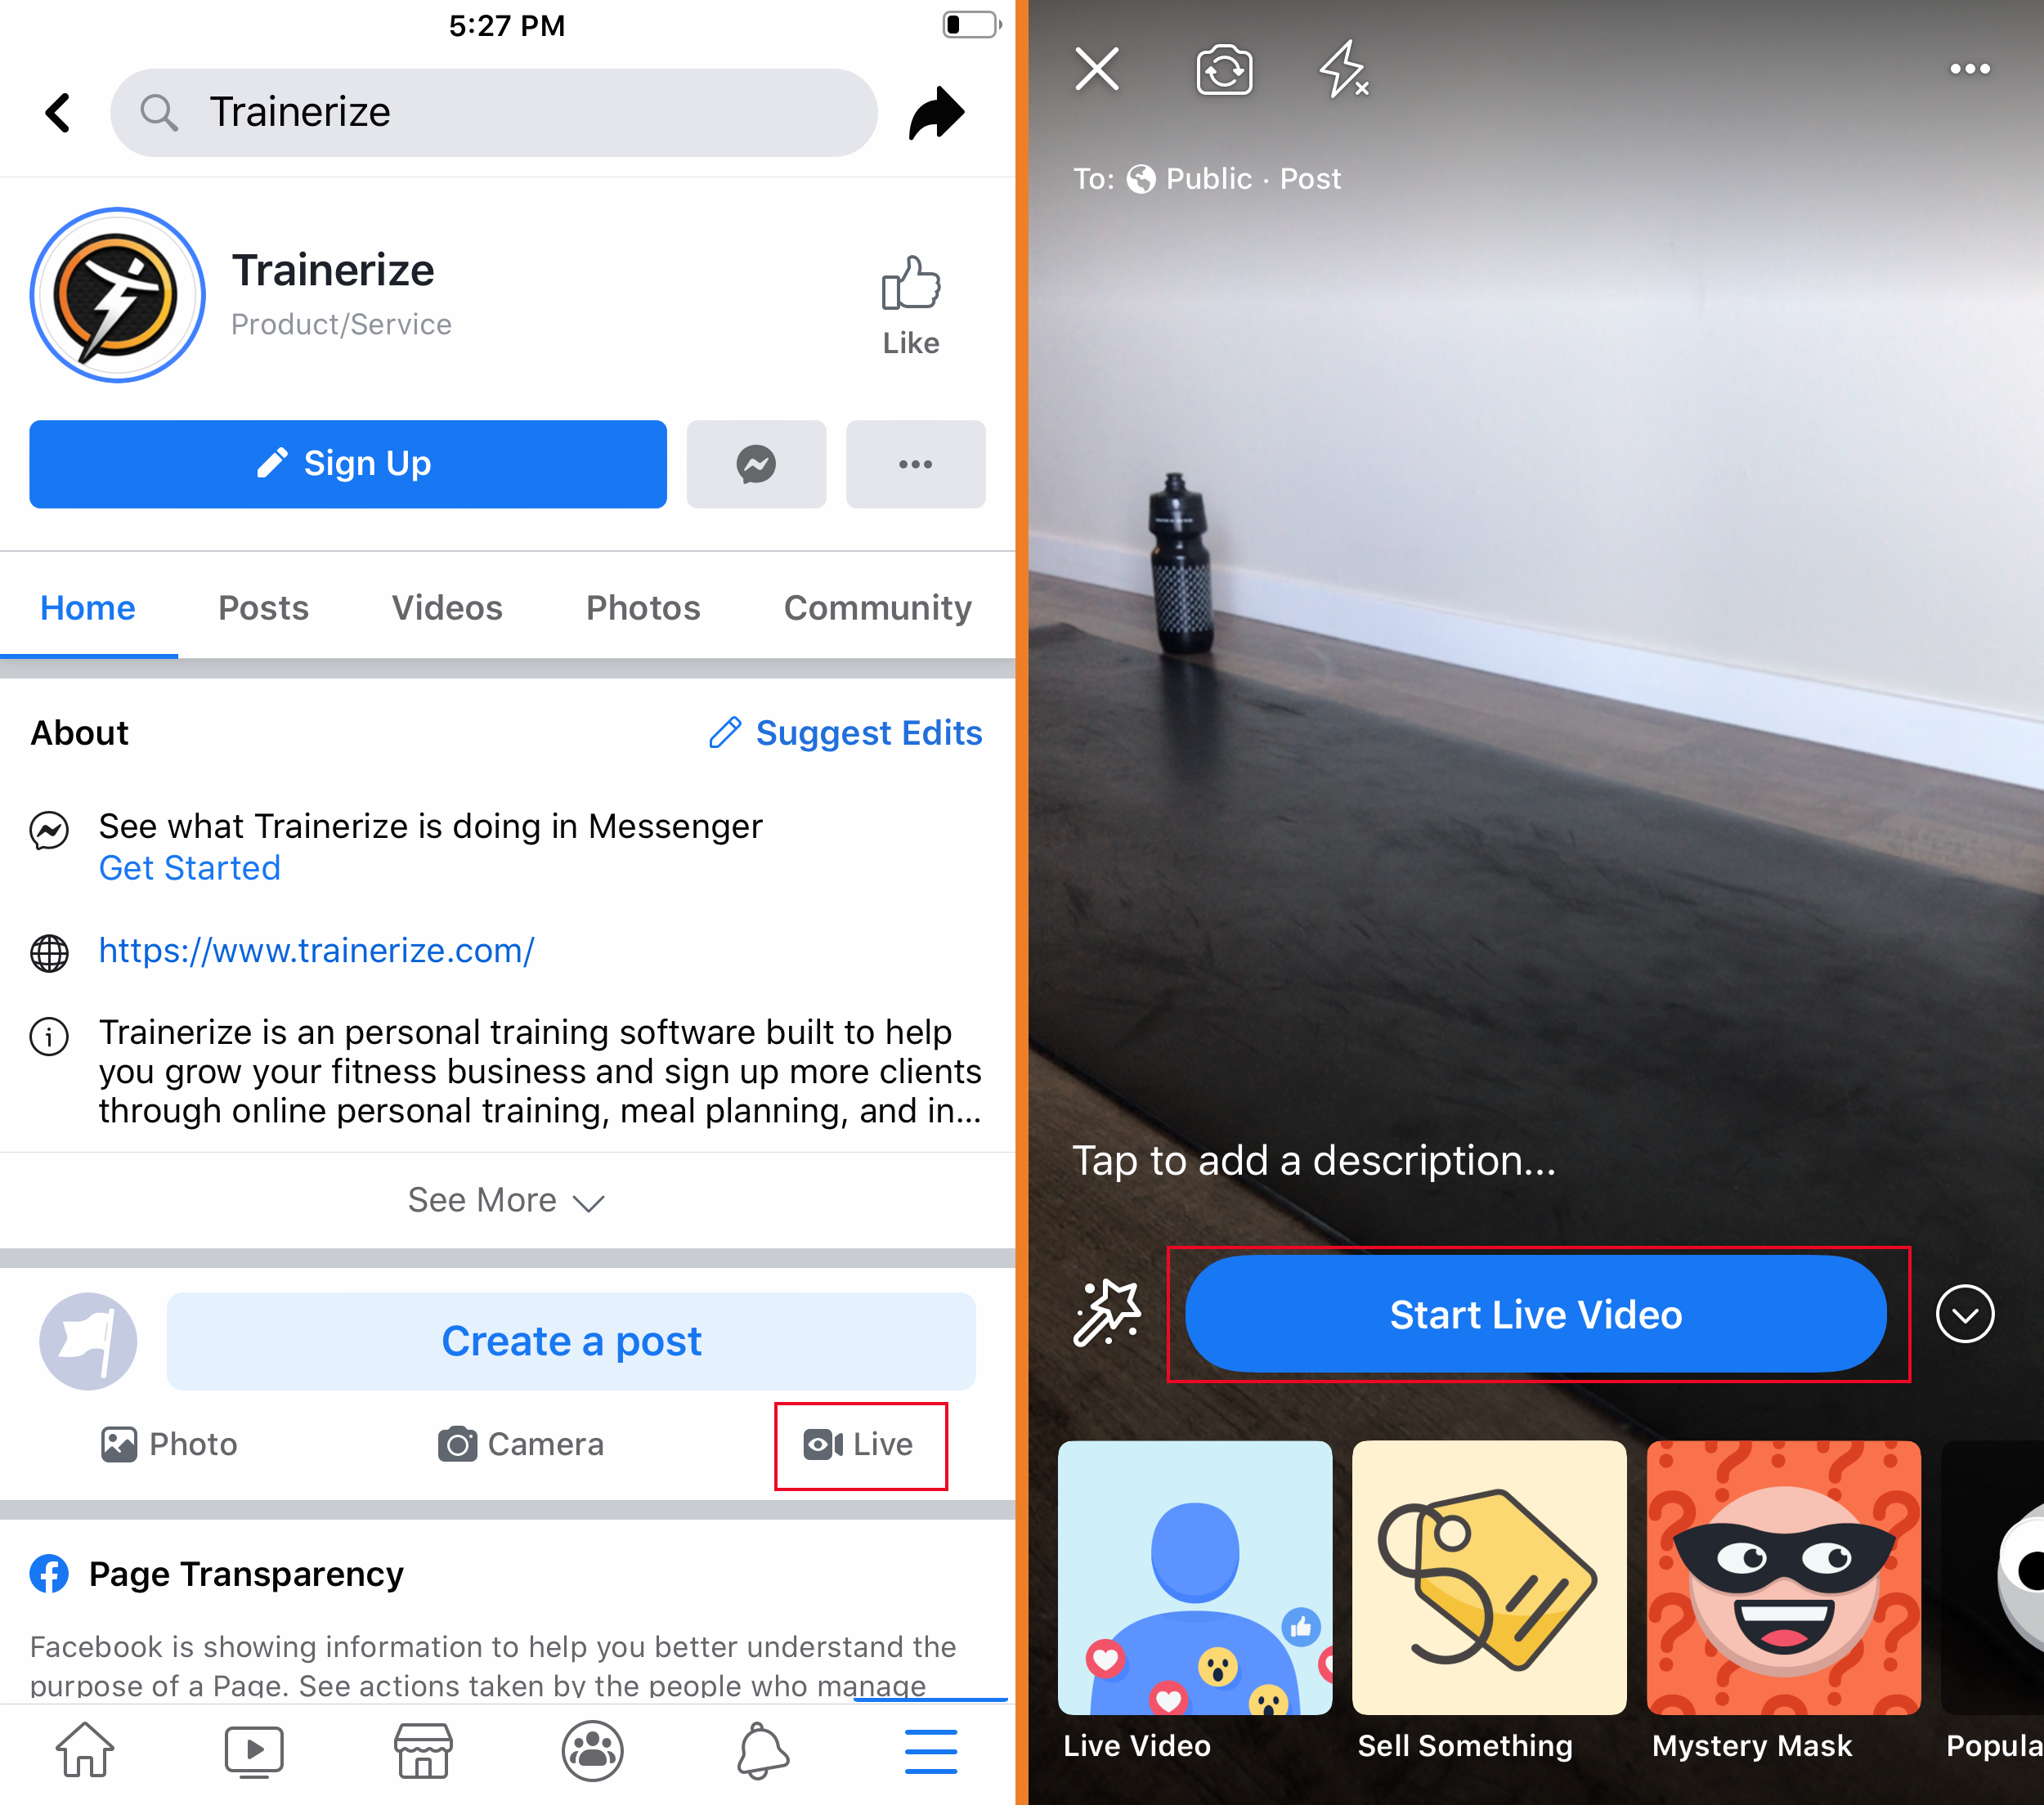
- Five minutes before you’re scheduled to go live, head to the Facebook app. Navigate to the right page, whether it’s your business page or your club’s business page.
- Once on the right page, scroll down until you see “Create a post.” Below it, on the right, there’s a “Live” button. Click it!
- Click “Start Live Video.”
- You’re live!
- When you’re finished the workout, click Finish. Save your workout, and then click “Share” to post to your page.
Facebook Live on Desktop
- Five minutes before you’re scheduled to go live, head to your Facebook page.
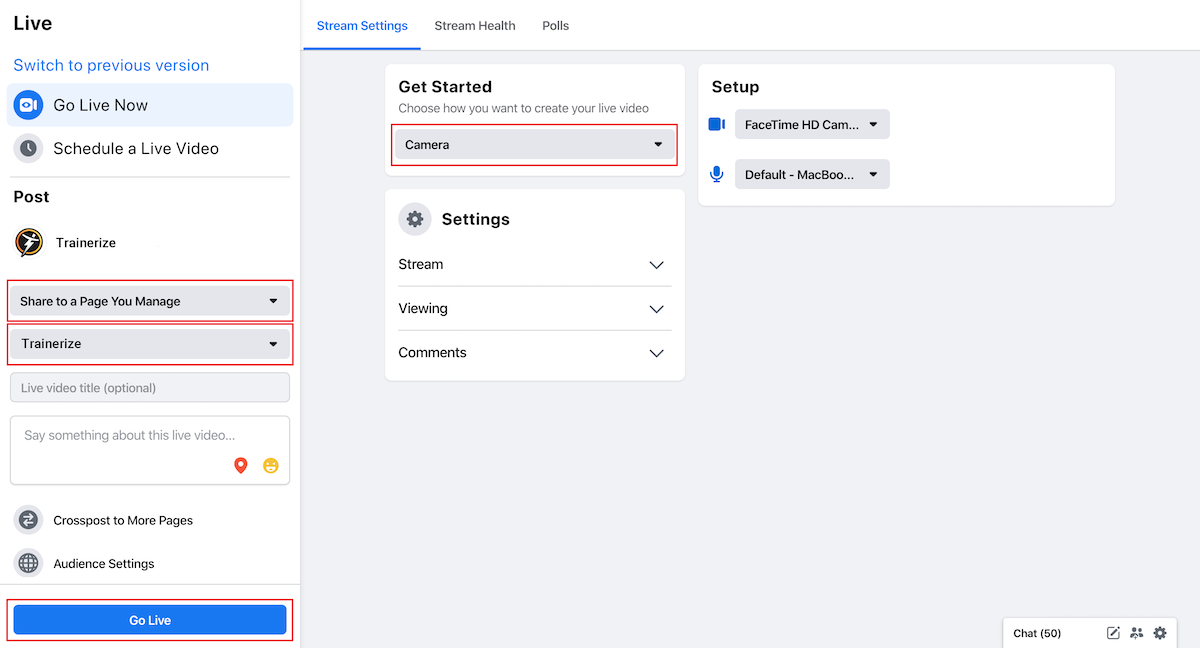
- Scroll down until you see “Create” and then click “Live”.
- This will take you to the new Live Producer portal.
- Make sure the right page is selected on the left-hand side.
- Give your live video a title.
- Add a description below the title.
- Crosspost your live video to another page, if you want to. You’ll have to be an editor on both pages.
- Under “Get Started”, select Camera.
- Under “Settings”, feel free to adjust. We recommend unselecting “End live if stream stops” just in case of slight connectivity issues.
- You’ll need to allow your browser to access your webcam and microphone, so do so in your browser.
- When you’re ready to go, click “Go Live”.
- You’re live!
- When you’re finished your workout, click “End Live Video”. It will publish to your page automatically, so head over there afterwards to check the post and make sure you’re happy with it.
Instagram Live
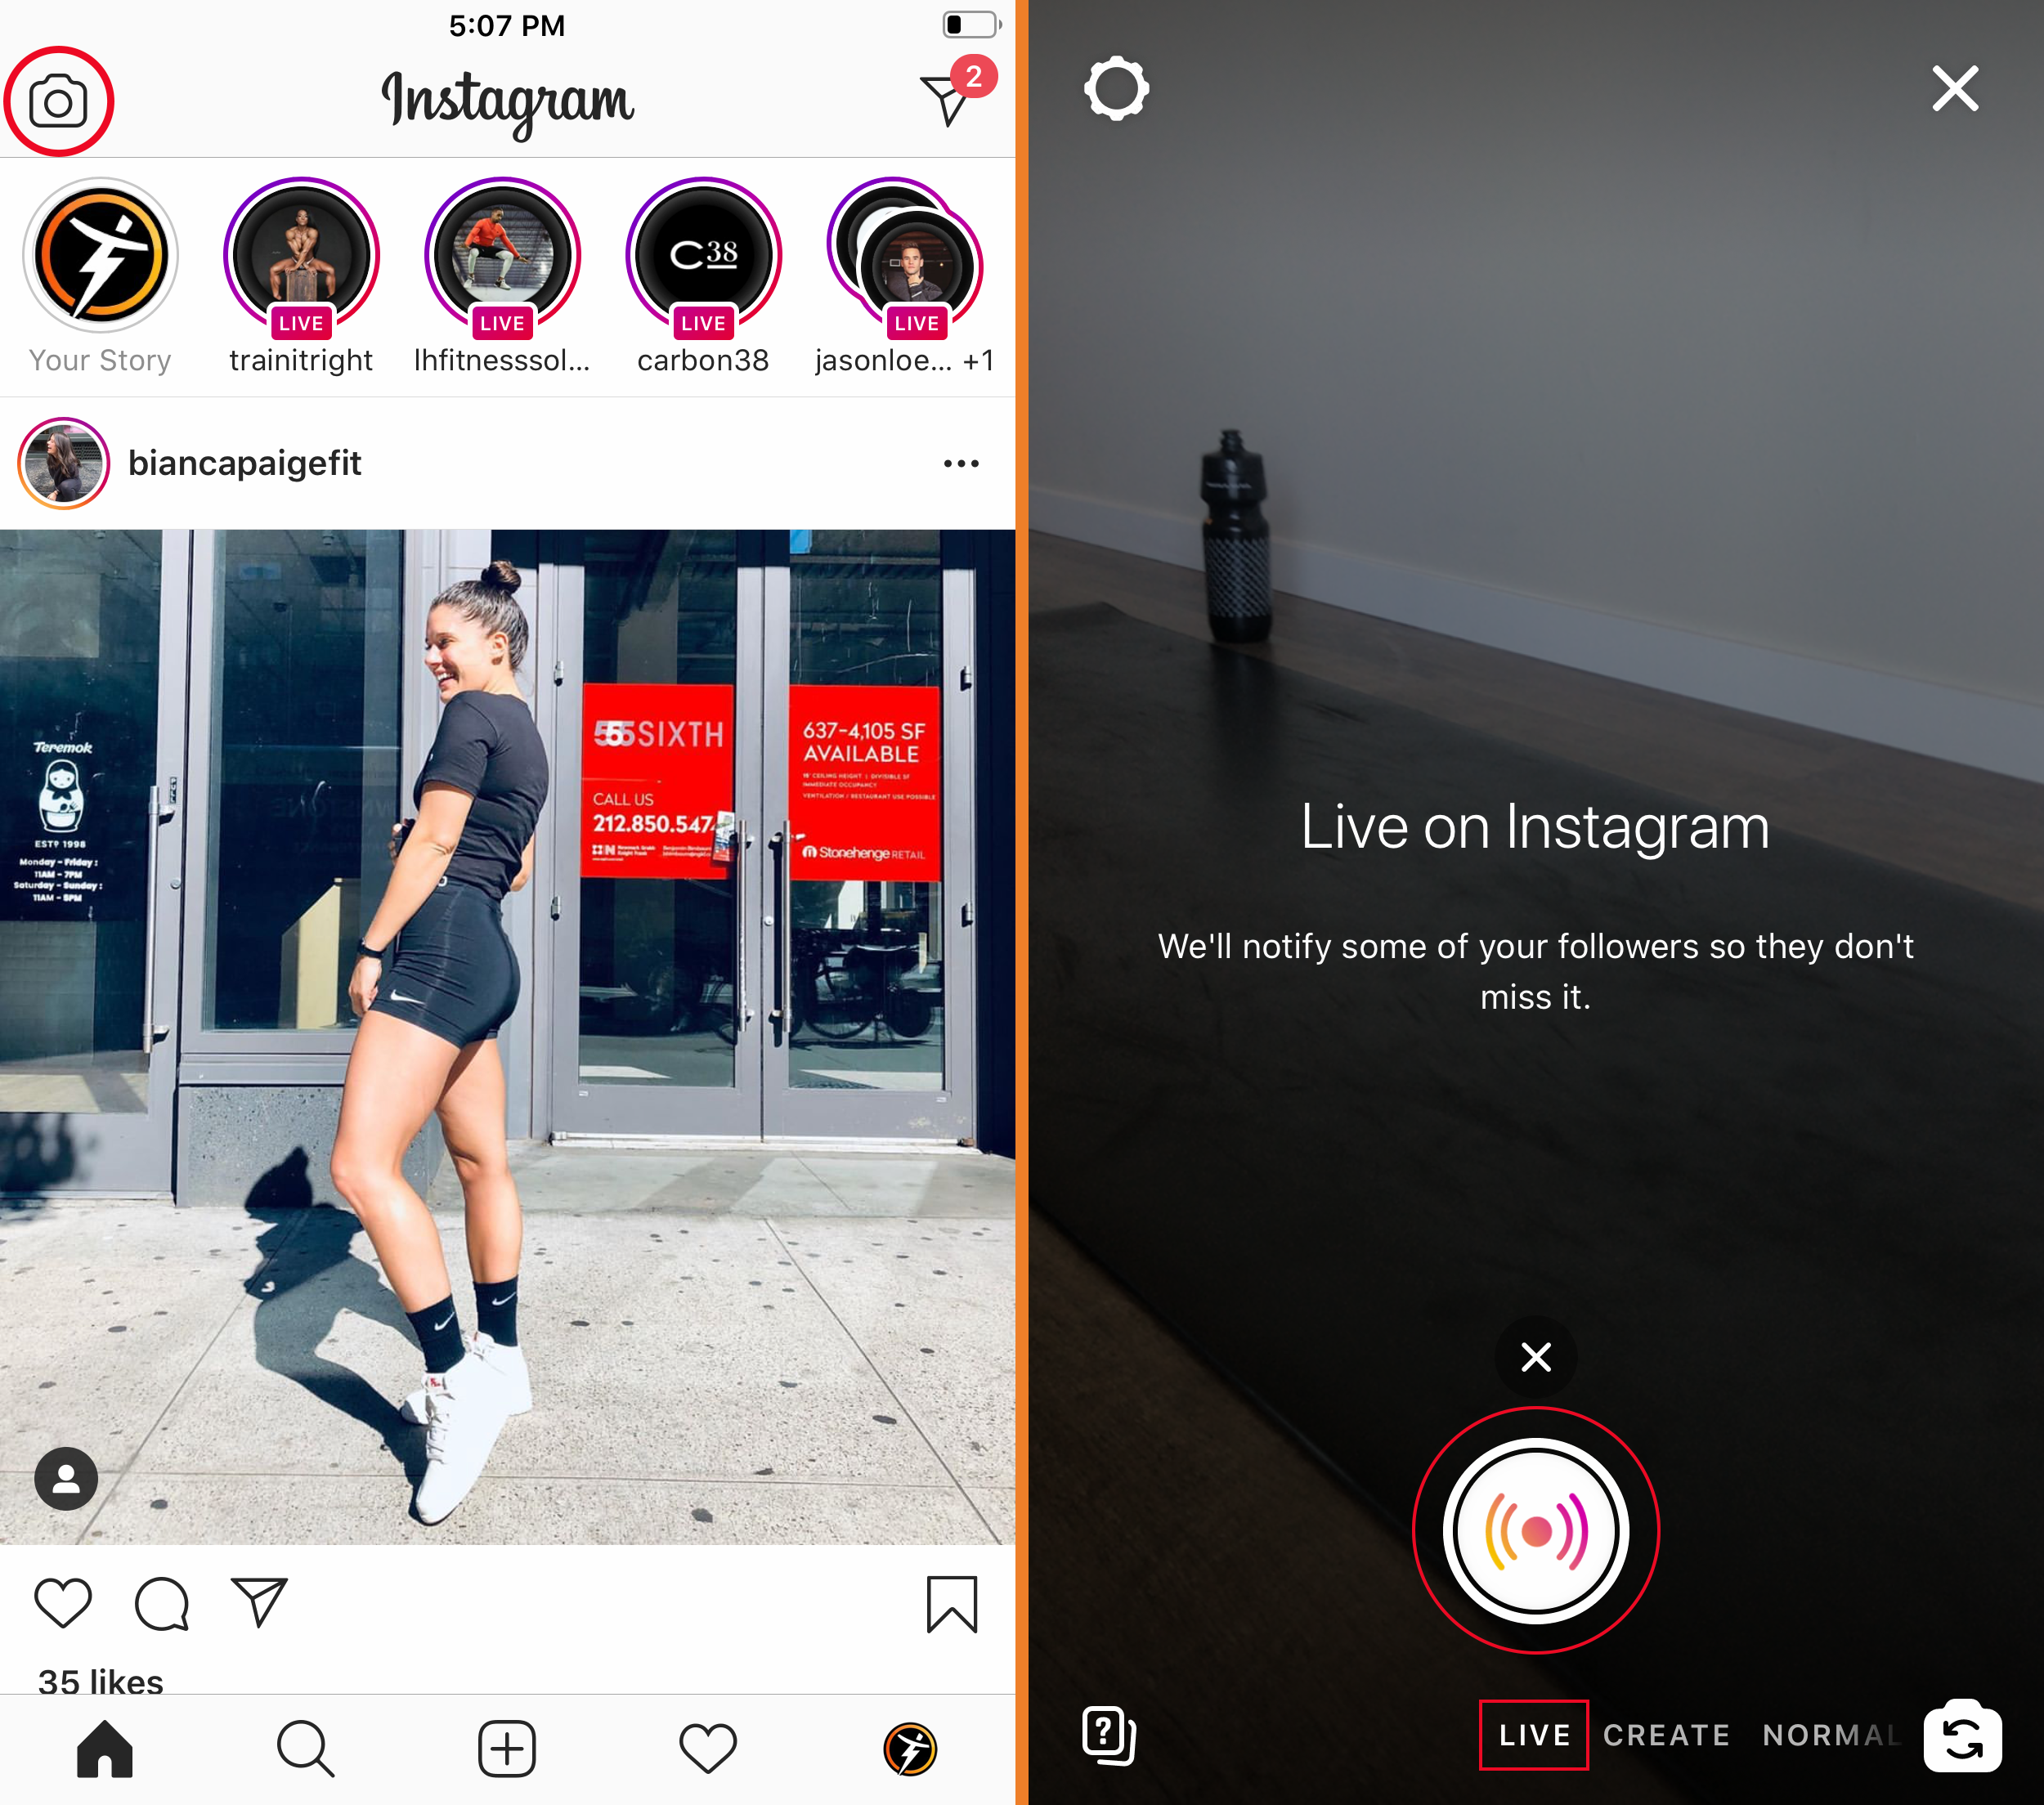
- Five minutes before you’re scheduled to go live, head to the Instagram app. Make sure you’re logged into the right account (if you have more than one, or if you’re going live on your club account).
- Once in the right profile, click your profile photo or the camera at the the top left-hand corner of the home screen (like you’re going to post an Instagram Story).
- Toggle the very bottom menu to the left until you see LIVE.
- Click the round record button.
- You’re live!
- Add a pinned comment. Click the comments box and type in a message, such as “Welcome! Let’s get sweaty.” or “Today’s workout is a 20-minute HIIT. I’ll save it to my story for everyone to access over the next 24 hours.” Post your comment, then tap the comment, and click “Pin Comment.” That way, even if others are commenting, your comment will stay at the top for viewers or late arrivals to reference.
- When you’re done, click “End”, then click download, and click “Share to Story”, where it will be featured for 24 hours, just like Instagram Stories.
Once You’re Live
Set up your phone or computer in your pre-planned and pre-tested position. For phone, use selfie mode. That way you can see your positioning and viewer comments.
At the beginning of your workout, take the opportunity to provide a bit of context to your viewers—it might be their first live workout too! Let them know what to expect, and establish whether or not you’ll be monitoring the comments throughout. We recommend telling people you’ll answer questions and follow up after the livestream is over (hello, new client leads!). This allows you to focus on the workout in the moment, and prevents you from awkwardly moving back and forth between your mat setup and your phone.
Take your fitness business to the next level.
Activate your free 30-day trial of Trainerize.
Go ahead with the workout. Keep an eye on your screen and make sure your livestream stays live. (There’s a handy icon at the top of the screen that you can monitor for Facebook and Instagram on mobile, and on Facebook desktop, you’ll see a stopwatch in the bottom left-hand corner of the screen.)
When the workout is done, finish off the livestream! Encourage everyone to follow you for more great content, and remind them to send any questions your way! Remind them of your next live workout (if you’ve got it scheduled already!). Then, end your livestream.
That’s it! You’re ready to stream live workouts. Not only will livestreaming earn you better visibility on your social channels, it’ll also create a personal experience in our digital world, earn you some new leads, and hey, it makes sure you get a workout in too! Interested in learning more about how to become an online personal trainer? Get in touch.


